|
|
CVB++ 14.1
|
|
|
CVB++ 14.1
|
The tutorials described here aim to give Common Vision Blox (CVB) users an introduction into the use of the newly introduced acquisition functions and features in Common Vision Blox 13.4.
This document is intended to be read top-down as the examples described further down build upon what has been described previously.
To stay in line with recent developments in the GenICam standard, the acquisition engine of CVB has been modified to accommodate some of the recently introduced use cases:
For that, the following set of new objects has been implemented in the CVB hardware abstraction layer:
The term, Flow, initially comes from the GenICam GenTL Standard. The GenTL Standard defines the term as follows:
The flows are independent channels within the data stream, responsible to transfer individual components of the acquisition data.
For a better distinction, let's temporarily and explicitly call it a GenTL Flow. On the other hand, CVB redefines the term as follows:
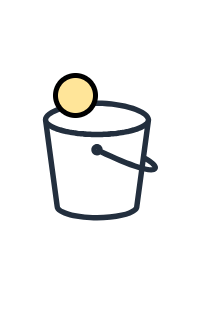
A Flow is a data buffer that is supposed to be attached to a GenTL Flow to store a single information unit such as image data, or other auxiliary information, as a part of single Composite.
In the following diagram, the bucket represents a buffer and the yellow ball represents a piece of component data of an acquired Composite:
CVB defines two more relevant terms. The terms are a Flow Set and a Flow Set Pool. A Flow Set is defined as follows:
A Flow Set is a set of CVB Flows.
In the following diagram, the set of Flows in the red rounded rectangle, represents a single Flow Set that consists of M Flows where M is a positive integer; note that the difference in object shape represents the difference in acquired component data types:
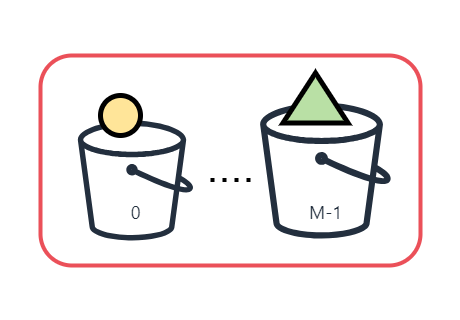
Note that the number of Flows, M, does not necessarily mean the number of data components in a single Composite. On the other hand, the other term, a Flow Set Pool* is defined as follows:
A Flow Set Pool is a set of Flow Sets.
In the following diagram, the set of Flow Sets in the blue rounded rectangle, represents a single Flow Set Pool that consits of N Flow Sets where N is also a positive integer:
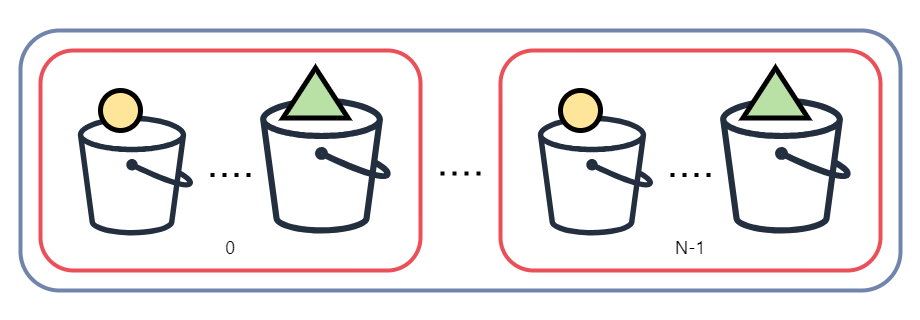
The number of Flow Sets, N, needs to be considered depending on the relationship between the mean processing time on the consumer side and the acquisition time in the given image acquisition model. If the mean processing time can get longer than the other, the following acquired images will keep being discarded until a Flow Set is queued again. The idea of a Flow Set Pool is to resolve this situation by adjusting the number of Flow Sets so that the system can guarantee the image acquisition throughput of a continuous image acquisition task.
Depending on the hardware used for streaming, the developer can decide between three different options:
This stream type matches the vast majority of applications, where a standard camera is used for mono or color image acquisition. The object acquired can be interpreted as traditional image buffers. Furthermore, when receiving a MultiPartImage through this stream type, this object is composed of one or multiple composed images.
As derived from the name, this stream type delivers the components associated to a 3D acquisition device. This stream type allows an indexed access to the different parts of the data. The data typically is organized in planes. The most basic example of a pointcloud holds three coordinate planes x, y and z. Depending on the manufacturer additional planes can streamed and easily accessed by the appended planes.
If none of the above stream types fits into the applications needs, this generic stream type offers a dynamic payload interpretation, composed of the other interpretable object types. For example, this object type can combine buffers holding an Image, as well as a PointCloud, at the same time. A developer should be aware of the increased complexity when using this stream type.
The objects returned from an acquisition or extracted from a composite can be represented by the following classes:
In order to use shared ownership on the data with the driver, the object is represented by its corresponding pointer named with the postfix "-Ptr" after the class name.
(Tutorial: CppSingleStreamComposite)
This tutorial covers data acquisition that is from a camera with a single data stream. The buffer allocation will be managed by the stream itself. This use case is a straightforward and basic scenario – other more complex scenarios will be covered by the other tutorials described here.
In this tutorial the following classes are invoked for acquisition:
Furthermore, the following map helps printing the failure indicating code of the reported WaitStatus as a readable string:
The data acquisition described here goes through the following steps:
The following code block shows the code of the entire tutorial. The code streams from a single stream camera, executes 10 subsequent waits and stops acquisition. Each logical block will be explained in detail in the sections further down.
To get a list of devices the function Cvb::DeviceFactory::Discover needs to be called as follows:
The Discover method returns a list of device properties on which the function Cvb::Driver::DiscoveryProperties can be used for retrieving device information such as MAC address or device model name. The list also includes a unique access token that is used for instantiating the corresponding device. In the code above Cvb::DiscoverFlags::IgnoreVins is passed as the discovery flag to exclude CVB *.vin drivers other than the GenICam.vin.
The next step is to instantiate the device through its access token by using the DeviceFactory::Open function as follows
After the function was called successfully, the device represents a shared pointer to the newly opened device.
From the device, a data stream can (and should) now be instantiated. In our assumed scenario, only one data stream is involved, so by default, the stream at index zero is queried. The stream type is defined by the template specialization (Cvb::CompositeStream) of the Stream query function:
The returned object is a shared pointer to the stream object.
In this simple example the stream acquisition is simplified to the combined Start, which advises the driver to start the acquisition engine and stream control mechanism automatically. A user does not have to call these separate streaming components, separately. By default, infinite acquisition is triggered.
After starting the stream, the stream engine and control are running in the background until the stream is stopped, sending a continuous flow of images or composites.
Each composite will need to be proactively waited for by means of a call to WaitFor(TIMEOUT) on the stream. Passing a timeout to this function defines the maximum time to wait for the next piece of data.
The returned triple consists of three components. The actual composite, a status code, indicating the success of the wait and a nodemap enumerator, which can hold nodemaps delivering information about the received object parts.
Once WaitFor returns, the first thing to do is to have a look at the returned status value. If the status is not Ok one must assume that something went wrong and the composite doesn’t actually hold a valid handle to newly acquired data:
The above defined error state translation WAIT_ERROR_STATES map produces readable error reasons.
Whereas the wait status returns Ok, a new composite has been acquired and can be processed. Then, we can turn our attention to the received data. As our simple application assumes a single composite element we extract this first element by:
In the simplest of cases, the newly acquired composite will simply point to an image object. This can be verified by the holds_alternative function:
In order to interpret this first element as an image, a call to Cvb::get follows this check:
The received shared_ptr to an Cvb::Image now provides convenient access to the image’s properties, as in this case the buffer memory address:
Once no more data from the device are needed it’ll be necessary to stop data acquisition. There are generally two approaches this: The one is "stop" and the other is "abort". "Stop" waits until the ongoing data acquisition process has been completed "abort" cancels any ongoing operations.
In this tutorial, we stop data acquisition by advising the driver to a combined Stop of the streaming components by the convenience function:
Cvb::Driver::DiscoveryInformation object.This tutorial explains how to acquired data from devices that support multiple data streams.
This tutorial explains how user-definable memory (as opposed to memory allocated by the driver) can be used as the delivery destination for acquired data.
This tutorial explains how to acquire structured data from devices that send multiple logical image parts in one go.
This tutorial expands the use case of the single data stream example to multi stream devices, i. e. devices that potentially deliver more than just one data stream with potentially different data types per stream. An example for such a device is a multispectral camera providing multiple streams transferring different spectral information (e.g. the JAI FS-series) or a device streaming a depth image and a RGB color image at the same time (e.g. the Intel RealSense series).
The sequence of logical steps is only a slight modification from the previously described single stream tutorial:
This tutorial interprets the received data as a MultiPartImage. The following helper describes the different types of buffers each of the parts can embody.
The source code for the multi stream case differs only slightly from the single stream case.
Where previously only one data stream was accessed, now all available streams on the device are accessed. Therefore, the index based stream fetching is used. The number of available streams gets queried with StreamCount() on the device - the queried streams are collected into a std::vector of type ImageStream. This enables parallel streaming over all streams.
The approach to starting the acquisition and acquiring the data basically remains the same in the multi stream case – the only difference being that it is now necessary to start the acquisition in a loop for all streams.
The multistream wait also requires a separate processing of the data. This is (in this simple demonstration) done in sequential evaluation of the Wait function for each stream, respectively. A more reasonable approach would be the evaluation in separate parallel threads for performance reasons.
The processing for the received image is done according to the helper PrintOutAllPartTypes described above.
Again, the only difference to the single stream example is that the stop function needs to be called on each of the streams. Following the reverse order compared to starting the stream, now the stream control is stopped before the acquisition engines for each stream. As opposed to the single stream case, stop rather than abort is used:
When using multi stream devices, the sequence of actions necessary on a single stream device simply needs to be extended from 1 stream to N streams. This means that stream->Start, stream->Stop and stream->WaitFor need to be called in a loop over all the required streams.
This tutorial demonstrates how to pass user-allocated memory as the target buffer(s) for image acquisition from a camera. This option is useful if, for example, the image data buffers need to satisfy extraordinary conditions like e.g. address alignment (if extensions like SSE or AVX are going to be used on the data) or a particular block of memory (if the image is to be used by a GPU).
For the explanation how user-allocated memory may be used for image and/or composite acquisition it is easier to refer to the slightly simpler cased of single stream acquisition. Of course user-allocated memory may be used in the same manner for multi stream acquisition by simply extending the concept from one stream (as demonstrated here) to multiple streams by looping over the streams like in the multi stream case.
In this tutorial the following classes are used for user allocated memory:
The sequence of steps basically matches the one described for single streams, the sole difference being an additional step for allocating the necessary buffers:
Again, this section will only show the code that differs from the single stream case with the individual blocks being explained further down.
When passing user-allocated buffers to a stream to be used as the destination memory for image acquisition, these buffers are organized in so-called "Flow Set Pools", one of which is to be set per stream by means of the RegisterExternalFlowSetPool function.
Each Flow Set Pool is effectively a list of "Flow Sets". The minimum number of Flow Sets per Flow Set Pool can be queried with the function MinRequiredFlowSetCount. This minimum pool size must be observed when constructing a flow set pool. A maximum pool size is not explicitly defined and is normally up to the user and the amount of available memory in a given system.
The Flow Sets in turn are lists of "Flows". Flows can simply be thought of as buffers. However it is to a certain extent up to the camera how this buffer will be used and therefore the simple equation 1 Flow = 1 Image buffer is not necessarily true. The size of these Flows is a device-specific information that needs to be queried with the function FlowSetInfo.Size.
The code for instantiating a device is effectively the same as in the single stream case.
The logic for generating and assigning the flow set pool is located in the main code part. UserFlowSetPool itself is a helper class for flow sets and derived from FlowSetPool. At the core of the class is a std::vector flowSets_. The flowSets_ simply holds the buffers that have been allocated for the flow set pool.
The UserFlowSetPool class provides a class for releasing the allocated buffer.
The first thing to create is the UserFlowSetPool and to query the number of flows from the stream via FlowSetInfo:
The flow buffers are allocated with the size and alignment information of the FlowSetInfo and stored into FlowSetPool.
At the end, the flowSetPoolPtr holds the entire Flow Set Pool. The buffers have to be released within the destructor of the UserFlowSetPool.
What is missing now is the Flow Set Pool to be passed to the stream.
One thing to point out here is that ownership of the Flow Set Pool passes from the local scope to the stream on which the pool is registered.
Once the stream itself ceases to exist, it will of course no longer need the registered Flow Set Pool and the destructor is called. The stream also takes care of flow sets still in use by the user. Thus the UserFlowSetPool will be deleted only when the last MultiPartImage, PointCloud or Composite is deleted.
Using user-allocated memory for data acquisition is possible, but properly generating the pool of memory that a stream can draw upon is somewhat complex as it will be necessary to...
To that end, the creation of an object hierarchy, that takes care of these intricacies, is recommended.
When using multi stream devices, the sequence of actions necessary on a single stream device simply needs to be extended from 1 stream to N streams. This means that EngineStart, EngineAbort/Stop, DeviceStart and DeviceAbort/Stop need to be called in a loop over all the required streams.
If the objective is simply to change the size of the memory pool but it is irrelevant where on the heap the flows are created, then the function RegisterManagedFlowSetPool provides an easy alternative to the fully user-allocated pool.
This fourth step concludes the group of the 3rd generation image acquisition interfaces tutorials and demonstrates multi part acquisition. Multi part basically means that the stream returns a composite instead of an image which may itself be one or more image(s), planes of pointcloud(s) etc. In other words: A composite is a composed iterable way of accessing and interpreting the delivered data. In order to find out what the result of a multi part acquisition actually contains it will be necessary to iterate over the returned composite's content. Furthermore, analysing the composites purpose will give a clue about its use case. (see AnalyseCompositeAt or PrintOutCompositePurpose). All use cases are represented by the Cvb::CompositePurpose enum.
If a developer wants a convenient access to the composite in the simplest of all composite streaming use cases, the following functions help converting:
In general, when working with composites, it is always a good idea to further analyse the contents for interpreting and processing the data. Steps towards this approach are demonstrated in this tutorial: If the inner structure of the composite is known by the cameras specification, the developer has indexed access to each item of the composite container and is able to analyse them:
The number of elements inside the composite can be extracted by composite->ItemCount().
In this demonstration the composite's content is further inspected for possibly held images by a call to Cvb::holds_alternative<ImagePtr>.
Furthermore, the composite's purpose can be found out by the function composite->Purpose The following code helps listing and printing the different values it can take.
This demonstration down will only yield interesting results when used with a device that actually sends multi part data. For the moment let's assume that the sample runs with a (hypothetical) camera that delivers a list of two images with one image being a color image and the other containing raw Bayer data.
The data acquisition described here goes through the following steps:
This is basically the same as in the single stream case because the only difference is how the result is processed.
As in the previous sections, only the difference between the single stream case and the Multi Part case will be shown:
As the device instantiation and acquisition code remains unchanged relative to the single stream tutorial it won't be touched upon any more. All that needs attention now is how the result data is processed, which happens in the after the break out of the "Ok" branch of the switch statement that evaluates the result of stream->WaitFor.
If the device did deliver the expected composite, then the assumption of this sample program that the composite is in fact a list of images needs to be verified. A list of images is a predefined possibility that can be queried by means of the helper PrintOutCompositePurpose Once the fact that a list of images has been received, the expectation that it is (at lest) two entries long should be verified before accessing the individual images inside AnalyseCompositeAt Of course a more interesting form of processing could (and should) be inserted at this point.
As has been shown, acquiring multi part data from a camera is not actually any more complex than acuiring a composite - the actual effort with multi part data goes into parsing the content of the received composite. Usually this will be done with the properties of the hardware in mind, i.e. like in the example above, the code usually contains assumptions about the content of the composite (that should, of course, be verified) and therefore tends to be somewhat device-specific.