The Device Configurator configures any GenICam device that is accessible to Common Vision Blox Applications via the GenICam.vin driver.
More in-depth information about network topologies, adapter configurations and GenICam settings can be found in the GenICam User Guide.
Configured Devices
The Configured Devices list (bottom panel) represents the devices which are currently configured in the GenICam.ini file and are in principle accessible through the GenICam.vin.
When the Device Configurator is opened for the first time, any available devices on the network will be automatically detected and configured and you should be able to see a live image from the first device if you check the "Grab" check box.
When working with GigE Vision cameras, two types of low-level drivers may be used to acquire images:
1.The Socket Driver (SD) is always present and passes the incoming image data from your device through the operating system's complete TCP/IP stack.
2. The Filter Driver (FD) is only available if the siFilterIP GigE Vision Filter Driver (NDIS 5.1, up to Windows 7) or the siNetFilter (NDIS 6, Windows 8 and higher) has been installed and configured properly for your network interface.
This filter driver attaches itself to the network card at a lower level and filters out the GigE vision packages before they are passed through the operating system's TCP/IP stack, passing them directly into Common Vision Blox and
thereby saving valuable CPU time.
You should use the Filter Driver if possible for much higher performance and lower CPU usage.
If you see the small icon  behind your device, this means that the device is currently accessed through the Socket Driver.
Please refer to the GenICam User Guide for hints about configuring your device and filter driver properly in this case.
If the Device Configurator emits an "Error Loading GenICam Driver" and you are certain that your device is reachable on the network, please open the Advanced Configuration (button above the preview display) - the device might currently be in use by another application or is on a different sub net and the Advanced Configuration tool will point this out.
If this is not the case but the device is still inaccessible, please refer to the GenICam User Guide for troubleshooting options.
Toolbar and Commands
The toolbar above the Configure Devices list exposes the following commands:
 |
Acquisition devices that have been added to the network/computer will not show up in the Device Configurator automatically - they will have be scanned for. This is what the Discover command does. All recognized and reachable devices will be added to the list of Configured Devices. Those devices that were previously configured but are not reachable any more (indicated by a red camera icon) will be removed from the list. After the update, the list of Configured Devices can be saved to the GenICam.ini file (see below). |
 |
Opens a popup menu with the available Device Options. |
  |
Move the currently selected device up or down in the list. The list position ultimately decides upon the (virtual) camera port through which a device may be addressed (the first camera in the list sits on port 0, the second on part 1 and so on). |
 |
Remove the currently selected device from the list of Configured Devices (making it invisible to the GenICam.vin). |
 |
Save the current list of Configured Devices to the GenICam.ini file. |
 |
Discard the last changes and return to the state the Device Configurator was in when it was initially started. |
|
Some settings that can be made on the property tree are not automatically propagated from the device to Common Vision Blox image (in most cases these are settings that affect the image size). |
|
The "User Name" column of the Configured Devices list is editable. Double click it to change a device's name. The changes made here will be committed to the device directly once the cell looses the input focus. |
The Advance Configuration front-end is designed for experienced users who need to manage many devices and access advanced device settings. For details about the Advanced Configuration front-end there is a dedicated chapter in this documentation. |
Preview
Atop the list of Configured Devices sits a preview display that shows the image(s) acquired by the currently selected device.
To the right of the display under Properties, the GenICam device tree shows a hierarchical view of a device's node map, giving the user the opportunity to directly interact with the currently selected device.
Note that depending on the device state some properties may be read only (for example many cameras forbid changing the trigger mode while the acquisition is already running).
Note that the properties on display in the tree are filtered by their visibility (by default, only "Beginner" features will be displayed).
To change the filter, click the "Options" button atop the tree and change the "Max Visibility" setting.
Device Options
The Device Options menu can be opened using the toolbar button or by right-clicking one entries in the list of Configured Devices.
The available options are:
Rotate Image
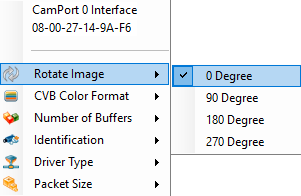 |
The images acquired by the GenICam.vin may be rotated by 90, 180 or 270 degrees. The rotation is completely virtual: The Image data will remain untouched - only the VPAT description of the image will be adapted (in other words: the image rotation comes at no extra processing costs).
|
CVB Color Format
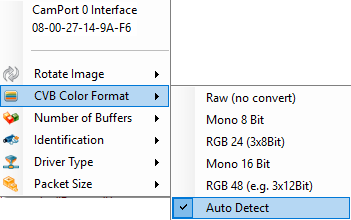 |
In principle the GenICam.vin supports the following input color formats (availability of a given format may, however, be limited depending on the camera): •Raw (no conversion) - in this mode the driver simply passes through the raw data sent by the camera; this mode is possible with all cameras •Mono 8 Bit •RGB 24 (debayering will - if necessary - be done by the GenICam.vin automatically) •Mono 16 Bit •RGB 48 •Auto Detect (detects the correct conversion automatically) |
Number of Buffers
Like almost all of the VIN-Driver in Common Vision Blox, the GenICam.vin supports a selectable number of acquisition buffers for asynchronous acquisition.
The default value is 3 for every device, however it is a good idea to increase the number of buffers to a higher value if the system RAM is large enough to hold a higher number of buffers.
A higher number of buffers helps significantly reduce the risk of lost frames if the processing time on one frame can be about as high as the gap between two frames (see also the description of IRingBuffer).
Identification
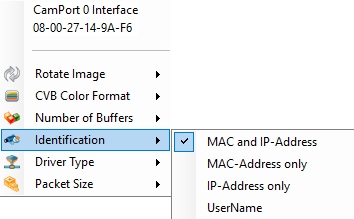 |
The GenICam.vin supports different modes for addressing GigE Vision acquisition devices (for USB3 Vision devices these settings will be ignored): •MAC and IP-Address •MAC-Address only* (in this case the IP-Address may change between sessions; useful if the cameras receive their IP-address from a DHCP server) •IP-Address only* •UserName |
* Note: The IP-Address of a device may be changed in the Advanced Config front-end
Keep in mind that it is essential for every identification method that the Interface-MAC does not change!
If the device is plugged into another NIC on the same system, it needs to be reconfigured to be loadable by the GenICam.vin even if the device's identification (MAC-Address/IP-Address/UserName) did not change.
Driver Type
For GigE Vision devices the type of network driver to be used may be specified here (for USB3 Vision cameras this setting will be ignored).
Usually the Filter Driver is the preferable choice because it helps reduce CPU usage and delivers better overall performance.
For debug and test purposes, however, it may sometimes make sense to use the Socket Driver.
The Socket Driver is actually even required when connecting via loop-back network e.g. to the GigE Vision Server (refer GigE Vision Server documentation).
Properties Options
The device tree options may be opened clicking the Options button that sits atop the GenICam node map view.
This will bring up a pop-up menu that offers the following commands:
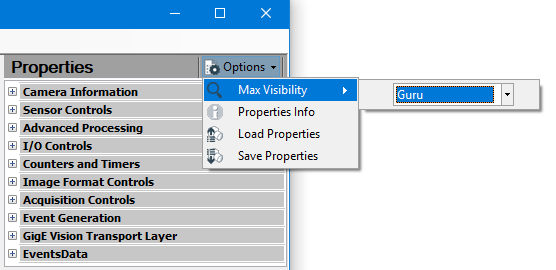
Max Visibility
"Max Visibility" acts as a filter for the GenICam Nodes that are visible in the node map view.
This makes sense because usually a camera supports not only settings that are easily understandable (like exposure time, gain, etc.) but also advanced functionality that requires a higher level of experience to use it correctly (for example timing generators inside the camera).
Therefore, a camera's XML file can assign a complexity level ("Beginner", "Expert" or "Guru") to each node, and the node map view can then be filtered accordingly.
By default the GenICam Device Configurator will start with the "Beginner" level.
Properties Info
This command will bring up a dialog that displays information about the XML file that has been used to generate the node map that is currently on display (like version, schema version, etc.).
Load Properties/Save Properties
These commands can be used to load/save a set of GenICam settings from/to a GenICam settings file (*.gcs).
GenICam settings files are text files that contain serialized GenICam node settings. In principle GenICam settings files are a means of transferring a configuration from one camera to another.
However, they are not always that easy to use: GenICam devices do not necessarily allow their features to be set in an arbitrary sequence due to inter-node dependencies (i.e. setting one node may alter other nodes, or setting a node is only possible if another node has a specific value).
There is no mechanism in the GenApi to define "the proper" sequence, so transferring camera settings by means of a GenICam settings file is often a matter of trial and error until the correct sequence has been found out.
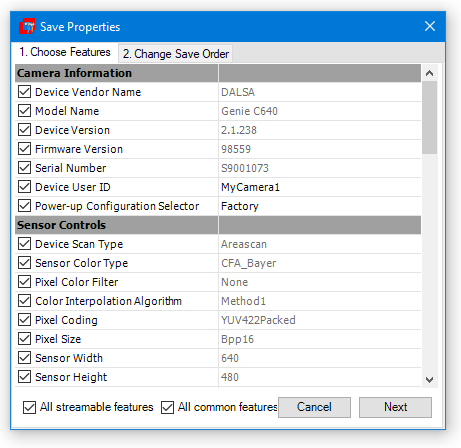
When saving GenICam settings to a GenICam settings file, the Device Configurator will first of all present a list of the serializeable features of the device and select all streamable (i.e. features where the manufacturer of the device activated the stramable flag) and common features (like ExposureTime, Gain, PixelFormat, FrameRage and trigger settings) for serialization. Modify the selection as needed and click "Next".
Remarks:
•Selector-dependent features will be serialized with every available selector option; therefore saving settings files with selectors with many possible values like e.g. pixel-specific gain values for a CMOS sensor may take a very long and result in very big files with potentially millions of values).
•Opening the save dialog for devices that have no nodes that have been marked as streamable will result in an empty list.
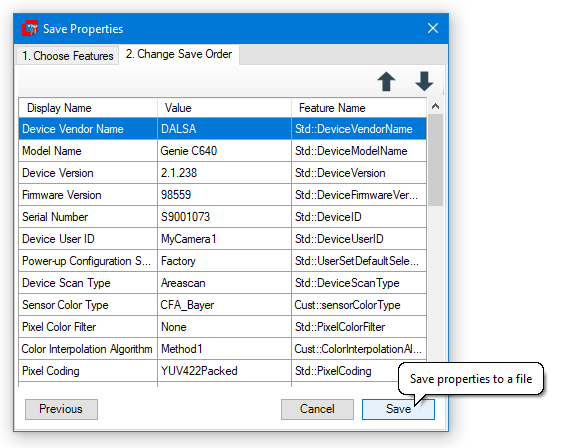
The 2nd tab that opens offers the possibility to manipulate the sequence in which the features are stored in the GenICam settings file. Here the actual sequence may (and possibly should) be adjusted to the requirements of the device.