This page shows how to use the Movie Interactive program assuming that a GenICam Video Interface (GenICam.vin) should be used.
The functionality of the program while using an Emulator File, Video File or another Video Interface is quite similar.
➢Start the Movie Interactive 2 program.
The main menu is shown and the button "Video Interfaces" can be clicked. Choose the GenICam driver (under %CVB%Drivers) and open it.
Now there are two buttons below the "Video Interfaces" button:
➢ Options (Grabber Property Dialog) and
➢ GenICam (GenICam Property Grid).
Use these two to make the settings for your grabber and your camera.
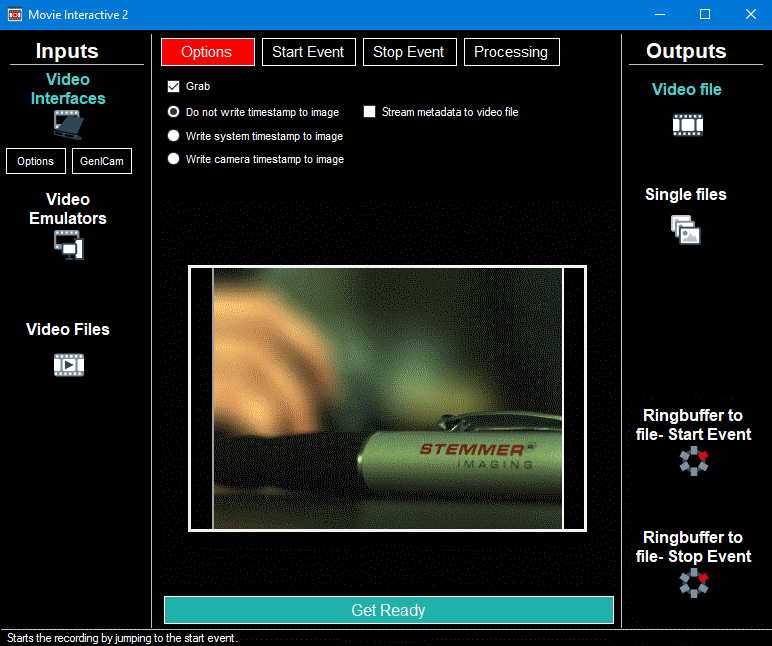
The following table shows all possible settings you are able to do with the four tabs before recording:
Menu Items |
Description |
Options |
Refer picture above. Grab: While checked you are able to see the real-time video in the image window below. Timestamp: Enable / dispabel timestamp writing to image. Metadata: With Movie Interactive 2 you are able to write metadata to your video file.
|
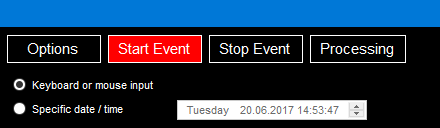
Start Event |
Select the Start Event (keyboard, mouse or a specific date / time).
Keyboard or mouse input: Starts acquisition with a keyboard or mouse signal. Specific date / time: Starts acquisition at a specific date and time.
|
Stop Event |
Select the Stop Event (keyboard, mouse or a specific date / time).
Keyboard or mouse input: Starts acquisition with a keyboard or mouse signal. Specific date / time: Starts acquisition at a specific date and time. Choose the "Number of frames" box in the down right corner to select the number of frames recorded after the stop event had occurred.
|
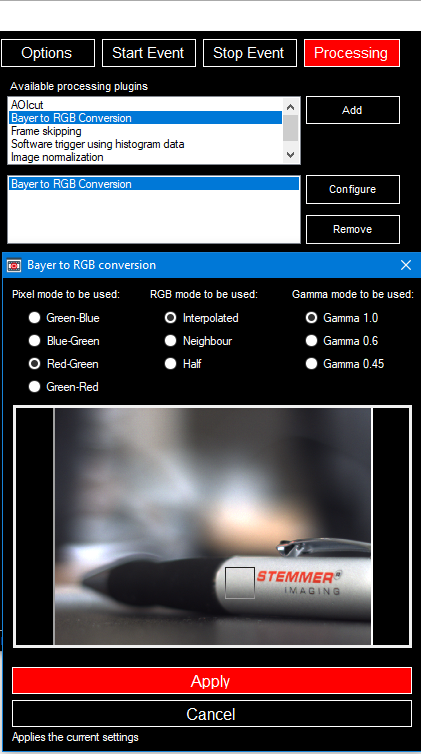
Processing |
Select the algorithms for processing the video stream before it's saved to harddisk.
Processing plugins as AOIcut, Bayer to RGB Conversion, Frame skipping, Image Normalization, Resize and Software Trigger are included. You are able to add one or more with the "Add" button and to do the settings with the "Configure" button. If you choose more than one plugin they will processed one by one from top to bottom. Refer to Plugins for Movie Interactive 2 for more information about these plugins. |

Especially for the "Video Interfaces" there two more possibilities as output.
Additional to the standard outputs (video file and single files) you can also choose two different kinds of ringbuffer handlings.
The outputs are explained at the User Interface chapter.
We choose "Ringbuffer to file -Start Event"
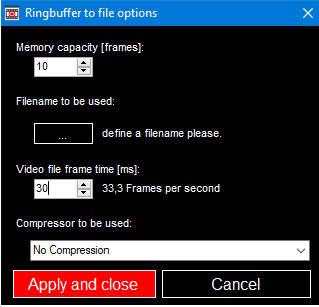
In this case 10 frames will be saved in ringbuffer after starting the recording.
In the drop down list you can select a codec to compress your video file bevore saving it.
Click "Apply and close" and a green "Get Ready" button will pop up in the main form.
Click this one and you are able to start the recording (in our case we start it with mouse or keyboard).