Before we start with out first shader example we have to talk about special data types of the HLSL compiler.
The available data types in HLSL are quite powerful when working with 2D images in a 3D environment.
Beside this HLSL can combine variables with a so called semantic, meaning you can define the trait of the variable.
Typical semantics are COLOR0 and TEXTCOORD0 defining a color respectively a texture coordinate.
The most important special data types are given in the following list:
sampler type |
|
A Sampler is a pseudo register for the texture inputs of a pixel shader. The sampler type uses a semantic to bind the variable to a defined register: sampler texture0 : register(s0); sampler texture1 : register(s1); In this example the variable texture0 can be used to access the fist texture in the register s0 while the second texture can be accessed by texture1 which is stored in the s1 register. |
|
float2 and float4 types |
|
This type simply creates an array of float values with a length of 2 respectively 4 elements. |
The next important issue is to understand the coordinate system used by the shader.
The GPU, a floating point processor, defines the width and the height of the image to be always 1.0.
The origin of the coordinate system is always located at the top, left corner of the first pixel.
The following schematic illustrates the coordinate system:
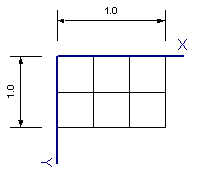
The width of a pixel in the coordinate system of the shader is therefore defined by 1.0 / ImageWidth.
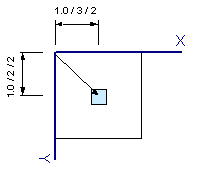
All gray values of a pixel are passed with respect to the left, top corner of the pixel.
As we want to read the pixel at its center we need to shift this position horizontally by 1.0 / ImageWidth / 2.0 and vertically by 1.0 / ImageHeight / 2.0.
This effect for the example above is illustrated in the following schematic for the first pixel:
The same approach is used in conjunction with the gray value of a pixel.
It’s always 0.0 -1.0, independent of the data type of the image.
This means a 16Bit and a 8Bit images both have a range of 0.0 - 1.0 .
Our sample starts with the definition of the textures to be used which is done by this two lines:
sampler texture0 : register(s0);
sampler texture1 : register(s1);
Afterwards we define the global variables taking the size and the pixel shift.
These variables are initialized by the host application using the D3DSetFloat function:
float fImageWidth;
float fImageHeight;
float fPixelShiftX;
float fPixelShiftY;
Now we need to define the input of the Pixel shader which is defined by the following structure:
struct PS_INPUT
{
float4 Color : COLOR0;
float2 Tex0 : TEXCOORD0;
};
The color element will hold the pixel value in a float4 type and the second element will hold the coordinates of the current pixel in a coordinate system aligned to the left, top of the pixel.
The semantics COLOR0 and TEXCOORD0 tells the pixel shader what to insert when calling the functions.
In the next lines we want to write our shader function which we want to use to swap the blue and the red pixel of the incoming pixel.
The shader function is called for each and every pixel of our input image and it returns the new pixel value.
We call this function SwapRB and here it is:
float4 SwapRB(PS_INPUT In) : COLOR
{
float4 currentPixel;
float2 PixelCoord = (float2)0;
float4 Out = (float4)0;
// get pixel position
PixelCoord.x = In.Tex0.x + fPixelShiftX;
PixelCoord.y = In.Tex0.y + fPixelShiftY;
currentPixel = tex2D(texture0, PixelCoord);
Out.r = currentPixel.b;
Out.g = currentPixel.g;
Out.b = currentPixel.r;
return Out;
}
First of all we define currentPixel which is used to store the color value of the current pixel.
The variable PixelCoord will take the coordinates of the center of the pixel using the coordinate of the pixels left and top passed as an input to the function corrected by the global variables fPixelShiftX and fPixelShiftY. The variable Out will take the modified pixel value.
In a first step we have to read the current pixel position and correct this to the center of the pixel.
The current pixel position has been passed to the shader function in the In parameter.
The type of In is PS_INPUT and an element of this is Tex0 which holds the position in x and y.
Now we read the pixel value at this corrected pixel position by calling the HLSL function tex2D which takes the texture and the position as parameters.
The rest of the code is very straight forward, we just swap r and b and return the resulting pixel color.
Let’s create a second example that averages two images.
We use the same global variables as in the first example and change the code of the pixel shader function:
float4 MyAverage(PS_INPUT In) : COLOR
{
float4 currFrameSample;
float4 backgroundSample;
float2 PixelCoord = (float2)0;
float4 Out = (float4)0;
// get pixel position
PixelCoord.x = In.Tex0.x + fPixelShiftX;
PixelCoord.y = In.Tex0.y + fPixelShiftY;
currFrameSample = tex2D(texture0, PixelCoord);
backgroundSample = tex2D(texture1, PixelCoord);
Out = currFrameSample * 0.5 + backgroundSample * 0.5;
return Out;
}
Here we read two pixels, currFrameSample and backgroundSample, from texture0 and texture1 respectively.
As both pixels range from 0.0 to 1.0 we have to multiply them by 0.5 to add them to create an average output image.
Several more examples are part of the CVB GPU Processing library, showing different filters as well as logical and arithmetic operators.
Refer %CVB%Tutorial\GPUprocessing for more examples.