|
|
Common Vision Blox 14.0
|
|
|
Common Vision Blox 14.0
|

Common Vision Blox Tool
 C-Style |  C++ | ") .Net API (C#, VB, F#) |  Python |
| Movie2.dll | Cvb::Movie2 | Stemmer.Cvb.Movie2 | cvb.movie2 |
The CVB Movie Tool makes it possible to stream CVB images into a standard AVI file which may afterwards be viewed with a standard video viewer (like the Windows Media Player or CVB) or which can afterwards be processed with standard video processing software. The images to be streamed may come from any CVB-Supported Frame grabber, GenICam compliant hardware, or may be generated artificially.
The user has the option to
For the operation of CVB Movie of course it is necessary to have a CVB Image Manager and Common Vision Blox-compatible acquisition hardware. In demo mode CVB Movie is limited in that it only produces AVI files with up to 50 frames.
The AVI files generated with CVB Movie
Standard size restrictions for AVI files apply also to the files generated with CVB Movie. In addition any selected codec for the AVI compression may impose further restrictions on image dimension or other characteristics (please refer to the documentation of the selected codec if available). Currently the AVI format generally does not support 10 bit data per pixel. 8 bit monochrome or 24 bit RGB per pixel of course are supported and can be streamed with Movie (please note, that many codecs transform 8 bit monochrome into 24 or 32 bits RGB or YUV color space prior to compression, so that the generated AVI file may ultimately contain three colour planes, whereas the source data had only one).
Video recording is usually a very resource-consuming application. Without on-the-fly compression of the video data a sufficiently fast hard disk system is required , preferably a RAID stripe set. Furthermore, CVB Movie has to rearrange (and in consequence to copy) the whole image data for every frame entered into the stream because the streaming format used in DirectShow expects the images in DIB format (upside down), but usually Frame grabbers deliver their data the other way round. When compression codecs are used it is not uncommon that a colour conversion is carried out before the compression itself (which is of course also quite time-consuming) is carried out and finally the data is written to disk.
To put it short: You will need to check, whether your intended target machine for CVB Movie is capable of giving you the performance and results you expect. Only with a sufficiently powerful computer CVB Movie will be able of recording at full video speed and resolution. If you are recording compressed video, it is preferable that during the recording of a sequence the host must not be occupied with other time consuming operations. Another alternative may of course be the combination of the Sequence tool and CVB Movie.
Refer also the Theory of Operation chapter, where a bit of the necessary background about the way the CVB Movie tool works is provided for the interested reader. This is followed by a description of the functions of the Movie API.
Image Acquisition Tool for recording sequences to an AVI file
This section is provided to give you a better understanding of the way the CVB Movie tool works and describes its possibilities and its limitations. DirectShow provides a relatively easy way of accessing the Windows platform's multimedia capabilities and CVB Movie uses this. In principle it gives you access to any DirectShow compression/decompression codec installed on your computer (Filters, VCM and DMO codecs) for either replaying a prerecorded AVI file or for encoding the data that is put into one.
A complete description of DirectShow can be found in the Microsoft online help, we will give a brief outline of the characteristics of this framework in this document. In DirectShow each element that provides or processes (displays) any kind of data (including but not limited to images belonging to a live video stream) is called a 'filter'. Those filters exchange their data through so-called pins which may be either output- or input-pins. Output and input pins may establish a direct connection to pass data from one to the other, but also events that control the flow of that data. With this concept, the components necessary to play a video file are (in the direction of data flow):
To do video streaming to disk, the filter chain is set up the other way round in a similar way - this process is handled for you by the CVB Movie tool.
One of the base parts of CVB Movie is therefore a filter that passes CVB image data into a DirectShow video stream. This filter has to deal with a special peculiarity of the AVI format: The uncompressed AVI stream consists of nothing else than Device Independent Bitmaps (DIBs), and those are arranged 'upside down' in memory. That means that the first line in memory is the last line of the bitmap and so on. Images delivered by a Camera or Frame grabber are normally oriented the other way round (exceptions to this rule exist; for example with some Frame grabbers you may choose the orientation prior to image transfer into host memory). The CVB source filter therefore has to rearrange (and in consequence to copy) the image data before it is passed on to whatever filter comes next. Although the CVB source filter will choose the fastest possible way to do this, this nevertheless always implies a performance loss to some extent (normally of the order of about 5 ms). The impact resulting from the need of rearrangement of the image data gets heavier, if the VPAT of the image object serving as a source for the AVI stream has a shape that requires rearrangement of the whole image data, not only the lines. In such cases, we measured performance drops by about 60% - so if you experience little performance and you are sure your hardware is not the cause, analyze your VPAT's; for good performance at least the XVPAT should be linear! With RGB-capable hardware you should always choose 24 Bit RGB formats if possible, because for RGB32 formats this reshaping of the image block in memory is mandatory.
More severe is the impact of compression on the performance, because here heavy processing of the data is done. Normally the standard MPEG4 codecs like Divx and Xvid can be used for real-time encoding with modern systems. But only with the most up-to-date computers today it is possible to record compressed AVI files in realtime with the newer high quality H.264/MPEG4-AVC codecs without losing images. Therefore, if speed is the main focus, you should either have a very strong number cruncher use a fast codec or consider using no compression when recording (which will however result in huge files in almost no time and requires a sufficiently fast hard disk system, preferably a RAID stripe set). Provided that either your hard disk and controller or your overall system are fast enough, chances are good that you will be able to record AVI files in real-time, without losing images, in a format which is readable on any computer (also without CVB). An even safer, but more costly alternative would be compressing the acquired sequences offline.
By the way: You can of course also compress uncompressed AVI files offline after recording, using the video file vin-driver of CVB and for example the MovieInteractive Tool. Which option is best, strongly depends on your hardware at hand and the needs in your application. Therefore the best help in choosing would be to test CVB Movie in demo mode on the target machine.
It is also important to note, that many DirectShow Video compression codecs impose restrictions on the video stream to be compressed in that they will only accept certain colour formats or certain image sizes. In most cases these restrictions are not well documented and published, but if they are not satisfied, CVB Movie will not be able to set up a proper filter connection and report an error when using such a codec. This ultimately is the reason, why some codecs do not appear to work properly with CVB Movie - whereas the true reason for this is simply that the requirements of the compression codec are not met (in rare cases this may also be a licensing issue: There are codecs that will refuse to work in a filter graph, if they are not properly licensed).
The programming approach for both, the DLL and the ActiveX control, in principle is the same:
Have a look at the descriptions of the above mentioned (and of course also the other) functions and properties in this documentation to get details about their calling parameters and return values. Also it is a good idea to look at the sample applications provided with the Movie tool to get an illustration of the above-mentioned.
Refer %CVB%Tutorial\Movie2 directory.
The Movie2.dll and the APIs can be found here.
The ActiceX Controls (Movie2.ocx) can be found here.
In addition to the standard properties dialogue(s) of your development environment, the CVB Movie Control offers one property page to change parameters of the respective object. Refer %CVB%Tutorial\Movie2\VC\VCMovie2OCXExample:
On the property page you have the option
As statistic values you can see the recorded frames and the dropped frames.
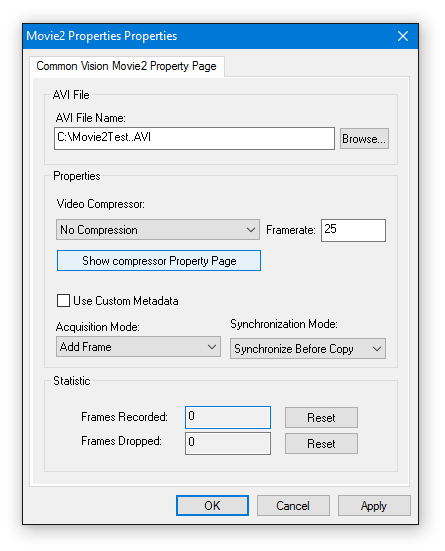
Please note that in contrast to standard behaviour, the "Apply" button is not functional, but changes made in the property page are rather submitted immediately to the associated ActiveX control!
This section of the CVB Movie Manual describes the functionality and the usage of the Movie Interactive program.
CVB Movie Interactive is available as an executable program and is installed with the CVB Movie Tool (%CVB%Applications).
The program allows recording of images to RAM or to harddisc and saving them as a video file in AVI format or as single image files. The image source can be any image acquisition device (such as a framegrabber or camera) which is supported by CVB. Also it is possible to use existing Video Emulators or Video Files to load image streams into the program. It allows
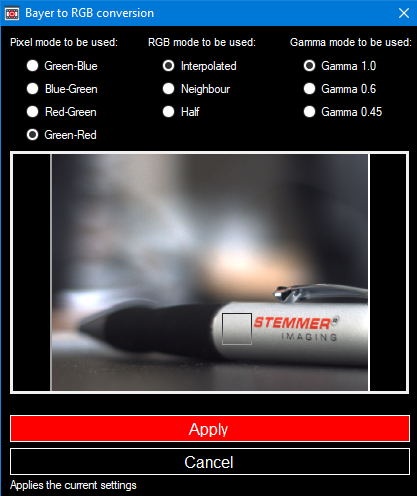
To deal with the increasing use of image acquisition devices which output a Bayer image, the program has the option to convert this monochrome Bayer image directly to a color RGB image. This is possible during recording and also afterwards using a Video File.
The two methods of acquiring images and saving them as a video file are:
RAM Recording:
The images from the camera are transferred into a Ringbuffer (allocated memory in RAM), where the number of buffers is given by the user and are read out if the user presses the appropriate button. After that the images are saved to disc as an AVI file. This method enables the saving of images acquired previously. There are two methods for RAM Recording implemented:
Harddisc Recording:
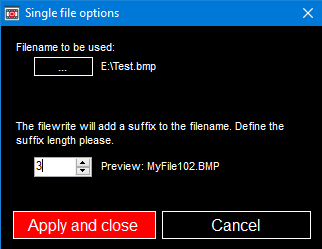
The images from the camera are directly transferred to the system and then saved to hard disc. Also it is possible to save the frames each by each into single files.
The Movie Interactive Program can be started from a shortcut in the program group
Programs -> STEMMER IMAGING -> Common Vision Blox -> Tools -> Movie (default installation path).
On your file system it is located in the CVB directory ..\Applications\MovieInteractive.exe
Main Menu
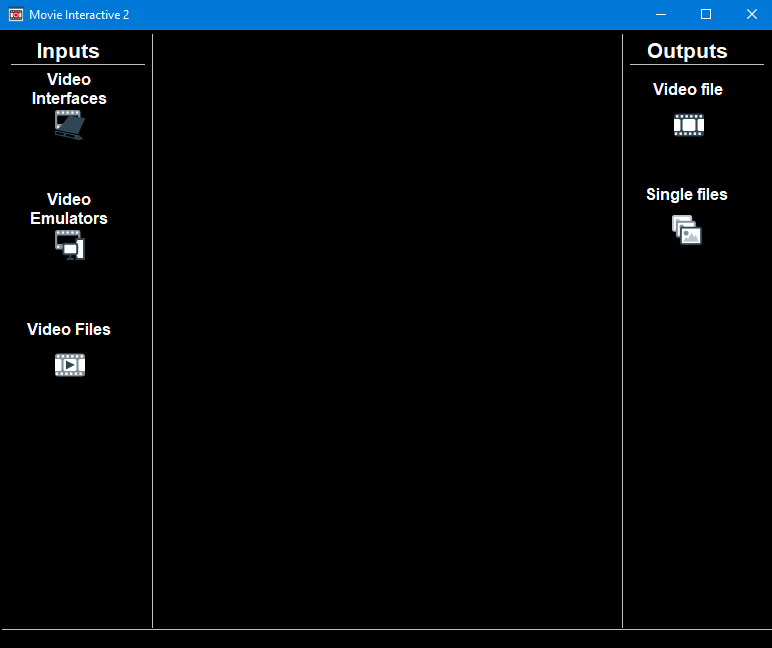
| Inputs | Description |
|---|---|
| Video Interfaces | Load one of the Common Vision Blox Video Interfaces (loading a VIN driver), installed on the system under %CVB%Drivers |
| Video Emulators | Load a Common Vision Blox Video Interface emulator (EMU) file (example EMU file under %CVB%Tutorial) |
| Video Files | Load a video file of various different types (AVI, MPG,...) |
Settings
The settings are shown as soon as a Video Interface, Video Emulator or Video File is loaded.

| Video Interface | Description |
|---|---|
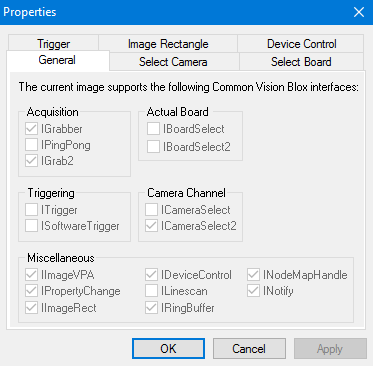
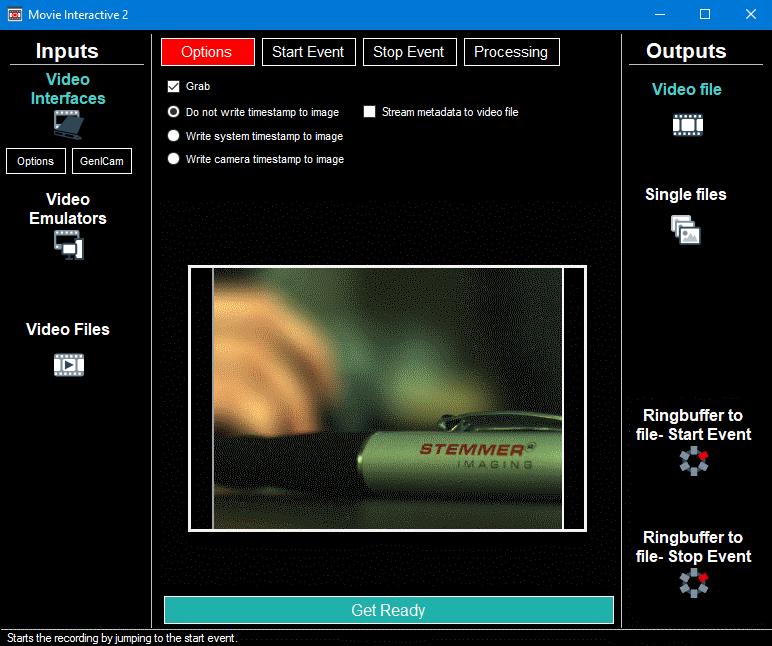
| Options | Opens the Grabber Property Dialog. |
| GenICam | Opens the GenICam Feature List. |
This page shows how to use the Movie Interactive program assuming that a GenICam Video Interface (GenICam.vin) should be used. The functionality of the program while using an Emulator File, Video File or another Video Interface is quite similar.
→ Start the Movie Interactive 2 program.
The main menu is shown and the button "Video Interfaces" can be clicked. Choose the GenICam driver (under %CVB%Drivers) and open it.
Now there are two buttons below the "Video Interfaces" button:
The following table shows all possible settings you are able to do with the four tabs before recording:
| Menu Items | Description |
|---|---|
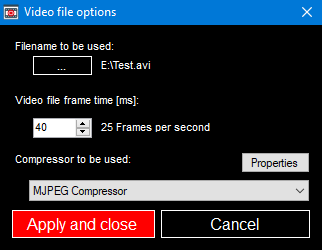
| Options | Refer picture above. Use the Option tab to select the handling of timestamps or to stream meta data to the video file. It's also possible to grab the video stream here. Grab: While checked you are able to see the real-time video in the image window below. Timestamp: Enable / dispabel timestamp writing to image. Metadata: With Movie Interactive 2 you are able to write metadata to your video file. This means for example that you can write a timestamp to the video file without changing the original image data. |
| Start Event | Select the Start Event (keyboard, mouse or a specific date / time).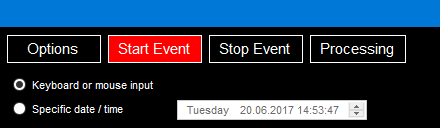 Keyboard or mouse input: Starts acquisition with a keyboard or mouse signal. Specific date / time: Starts acquisition at a specific date and time. |
| Stop Event | Select the Stop Event (keyboard, mouse or a specific date / time).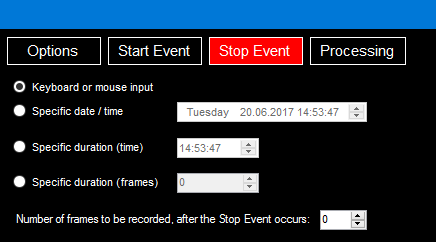 Keyboard or mouse input: Starts acquisition with a keyboard or mouse signal. Specific date / time: Starts acquisition at a specific date and time. Choose the "Number of frames" box in the down right corner to select the number of frames recorded after the stop event had occurred. |
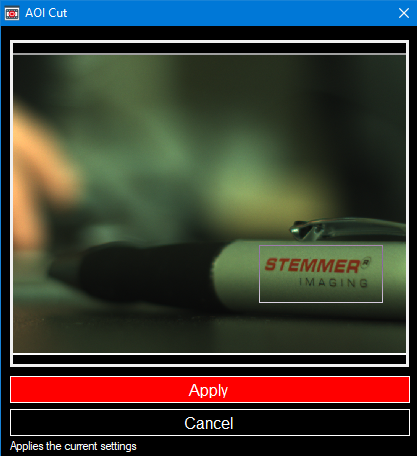
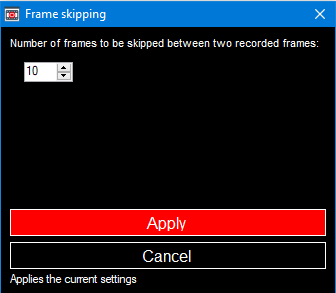
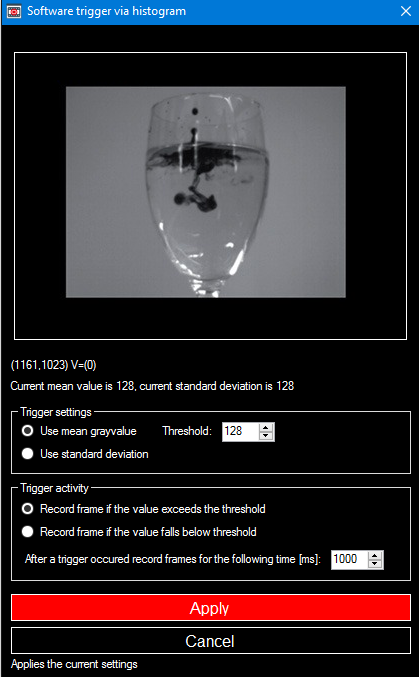
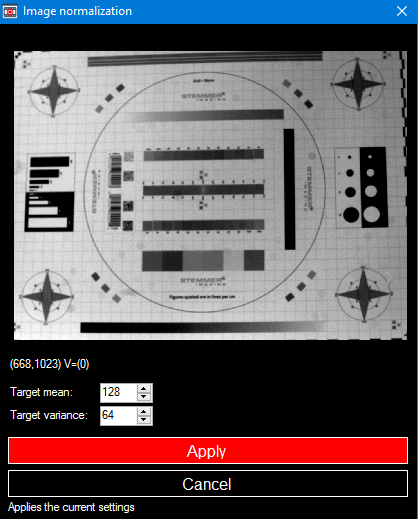
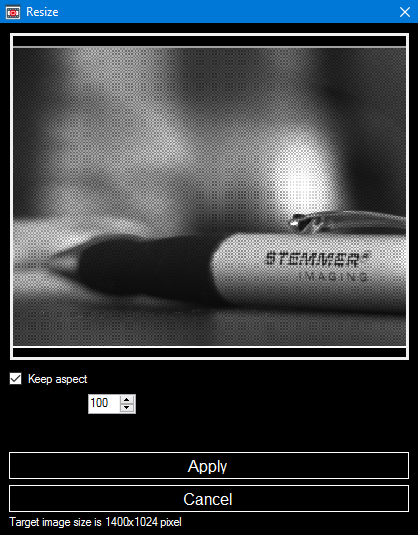
| Processing | Select the algorithms for processing the video stream before it's saved to harddisk.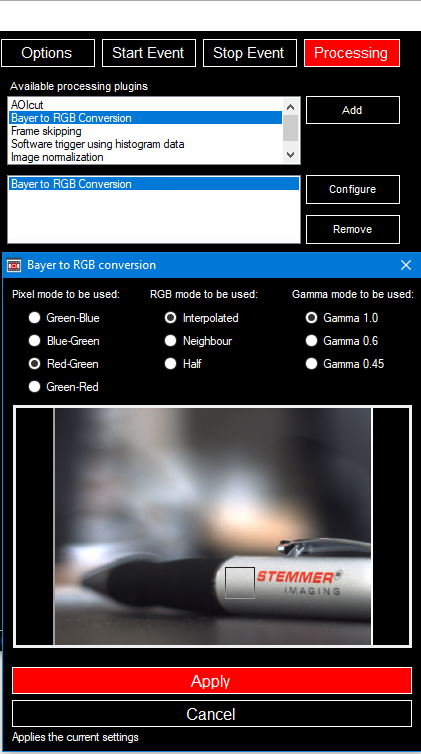 Processing plugins as AOIcut, Bayer to RGB Conversion, Frame skipping, Image Normalization, Resize and Software Trigger are included. You are able to add one or more with the "Add" button and to do the settings with the "Configure" button. If you choose more than one plugin they will processed one by one from top to bottom. Refer to Plugins for Movie Interactive 2 for more information about these plugins. |
Especially for the "Video Interfaces" there two more possibilities as output. Additional to the standard outputs (video file and single files) you can also choose two different kinds of ringbuffer handlings. The outputs are explained at the User Interface chapter.
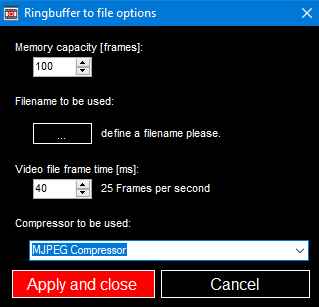
We choose "Ringbuffer to file -Start Event"
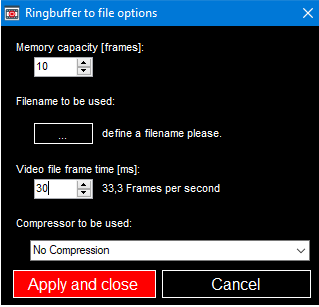
In this case 10 frames will be saved in ringbuffer after starting the recording. In the drop down list you can select a codec to compress your video file bevore saving it. Click "Apply and close" and a green "Get Ready" button will pop up in the main form. Click this one and you are able to start the recording (in our case we start it with mouse or keyboard).
Here you will find descriptions for all implemented plugins in Movie Interactive. Right now there are following plugins given:
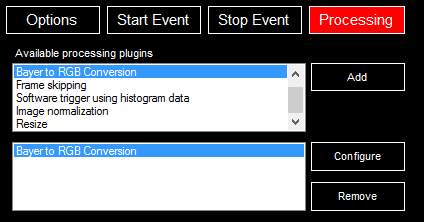
In the Processing menu of the main menu it is possible to select one or more plugins by marking it in the upper selection window and clicking the "Add" button. It will then be shown in the window below and it will be possible to make the set up with the "Configure" button. In the following table the different configuration windows will be shown and the settings explained.
The program uses the following components of Common Vision Blox:
Beside the basic Image Manager functionality for image acquisition there are special components e.g.