|
|
Common Vision Blox 14.0
|
|
|
Common Vision Blox 14.0
|
Common Vision Blox Foundation Package Tool
 C-Style |  C++ | ") .Net API (C#, VB, F#) |  Python |
| TextOut.dll |
TextOut is a Common Vision Blox tool for adding text to CVB images. Any user defined text will be added to an image as destructive overlay (refer Overlay Chapter in Common Vision Blox Manual for details). This means that the original image data will be replaced by the text-overlay. Since the inserted text will even be saved with the image CVB-TextOut is intended for adding time stamps or other information to images for error tracking or archiving.
To be most flexible the tool gets it's font information from a proprietary font file (*.cvf). Beside functions to add text to an image there is functionality implemented to generate font files from Windows TrueType fonts (e.g. Arial, Wingdings etc.) with different sizes and styles. To make font generation as easy as possible TextOut is delivered with a special font generation tool.
TextOut is available as part of the CVB Foundation Package.
CVB-Textout has two basic functions:
There are two reasons why a proprietary font file is needed.
CVB TextOut is shipped with one example font file. This file contains the standard ARIAL font. To generate font files with other fonts, styles and sizes a comfortable executable is delivered. This program is called FontGenerator. It uses the DLL's font generation function. So you can use this program or the font creating function from the DLL. The DLL function is described later in this documentation.
The executable is named FontCreator.exe and can be started via the Windows StartMenu or directly from the explorer in %CVB%Applications directory.
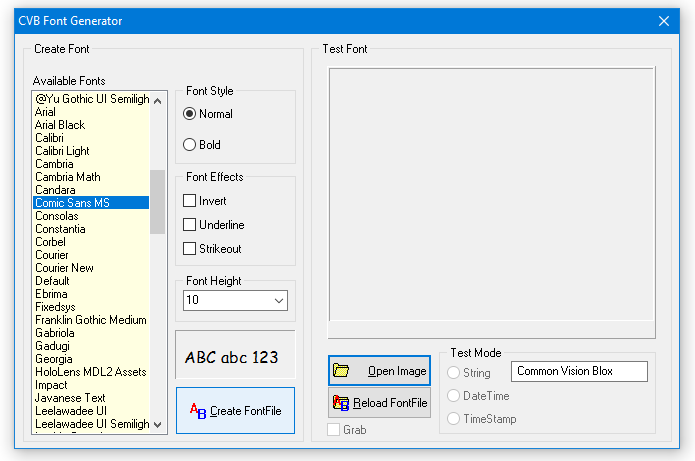
The dialog based application is splitted into 2 logical units represented by the two groupboxes:
While the left group delivers all functionality to create a font file with the desired parameters, the right group contains a test area to check the correct appearance of the created font.
For creating an own font file just select the desired font from the list of available fonts. The content of this list is created dynamically at program start. So the content of this list depends on the actually installed TrueType fonts on your system. The list content on your system may differ from the programs screenshot. After selecting a font please check the desired checkboxes for font styles and effects and define the desired size as well. The currently defined appearance is shown inside the small test panel of the program.
Once the desired appearance is defined the customized font file can be created. For this simply click on the button Create FontFile and select a name for this file. The standard extension for this file is *.cvf.
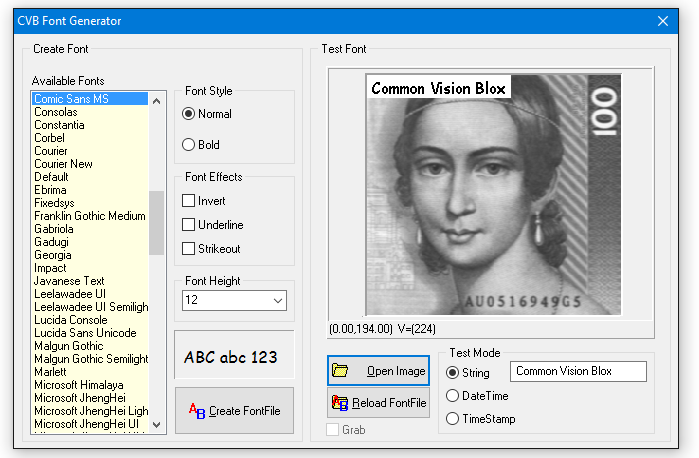
After the creation of a customized font file the appearance should be tested directly inside the FontCreator. Otherwise any font file can be loaded back into the application by clicking on Reload FontFile and selecting a valid font file. Open a sample image or load a *.vin driver to access you camera hardware by clicking on Open Image. If a font file just was created you can directly select a test mode by using the radio buttons on the right. By selecting one of the three modes the defined text-overlay will be added to the image on the top left position immediately.
String inserts the editable string from the edit box aside, example test "Commin Vision Blox":
DateTime inserts the actual system date and time:

TimeStamp inserts the actual value of the system's TickCounter
If a hardware driver (*.vin) is loaded the live acquisition can be enabled by clicking on the Grab checkbox.
Remember that CVB-TextOut overlays are destructive. Once an overlay is added the image data are modified and not reconstructable.
Since the overlay data are copied to the image data they belong to the image. Displaying the image in CVB-Display's panorama mode stretches the image to fit the active display area. This stretching is realized by pixel-dropping. So the appearance of the text-overlay is modified also. To get a real impression of the overlay the image has to be displayed in 1:1 scaling. This can be reached by zooming in the CVB-Display once. Then each image pixel is represented by one display pixel.