|
|
Common Vision Blox 14.0
|
|
|
Common Vision Blox 14.0
|

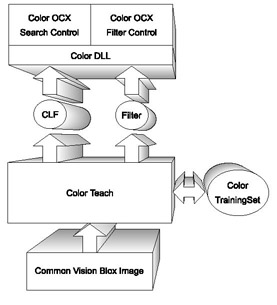
Common Vision Blox Tool
 C-Style |  C++ | ") .Net API (C#, VB, F#) |  Python |
| CVCColor.dll |
Color is a Common Vision Blox based tool to identify previously trained colors in Common Vision Blox Images. It contains two basic parts:
The idea is to let the user define colors in sample images, learn these colors and then find these colors in a new image in the inspection.
What we have and what we want
What we need
The Reality
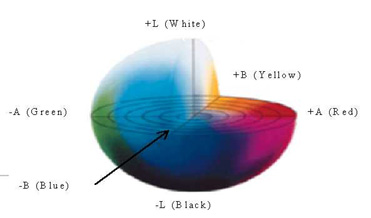
Finding color means in our case calculating a distances between a trained model and the average color of a given area of interest (from now on called AOI). The trained model which is the closest to the given AOI is the »found« model. For this we need a measurement in order to know how close two colors are. We also need a measurement that is as tolerant as possible to different lighting conditions (aging of light sources, different light intensities). Orange should be orange even if there's a shadow on the probe. In general images from color CCD cameras are RGB (Red/Green/Blue) images. This means every pixel has three components Red, Green and Blue which represents a point in the RGB color space:
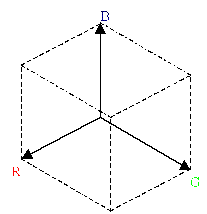
It would now be easy to measure the distance between these points and the larger the distance is the larger is the distance between these colors. The problem is that these distances are very different from the perception of the human eye. Even noise in the image can change the position in the color space dramatically. So colors which are close together for the eye aren't close together in the RGB-space and vice versus.
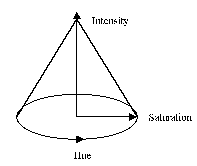
We need to transform our RGB pixel into a pixel in another color space. The goal is to use a color space where the distance comes as close as possible to the perception of color of the human eye. There are many color spaces out there. You can actually define your own if you want.
A Color Trainingset is a collection of color samples which describe a user defined color. This is done by defining areas in sample images. Each area should contain one color or what the human eye would look at as to be one color. These areas are called instances. One or more instances form the same color are combined to a model which then describes a user defined color. Therefore a »user defined color«, from now on called model, consists of one or more instances. One can add and delete instances as one like but a model must have at least one instance otherwise there is no model anymore. Be aware that the more and larger instances you have in your user defined color the longer it takes to learn a classifier and train a filter. To find a color only the number of models in your classificator has influence on the search time. The time to filter an image neither depends on the number of instance nor on the number of models.
In order to do that every pixel in all instances is transformed into the other color space (in this case CIELAB). In this version the only supported color space is CIELAB because in most cases it's the most usable. Never the less there will be other transformations in future versions.
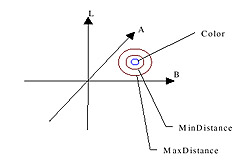
Each pixel is represented by a point in the »new« color space. From all the pixels of one model the tool calculates one center of the color, the optimum color and a deviation to it. The maximum distance from one pixel of a model to it's center is the maximum distance (from now on called MaxDistance). And last but not least there is another parameter called minimum distance (from now on called MinDistance) which is default set to zero. All three parameters are used to calculate a quality. But that's the next step. First let's put together:
| Color | The point in the new color space which is the best match for the model. |
| Instance | An area in a sample image which describes a color. |
| Model | A model consists of one or more user defined instances describing a »Color«. |
| MaxDistance | The distance at which a color has the quality zero. MaxDistance is set by the tool to the largest distance which has a point from this color to it's center. |
| MinDistance | Is the distance from the color to any point which has by definition quality 1.0; MinDistance is by default set to zero. |
This calculation is done on every instance of all models and stored in a Color Classificator (from now on called CLF). The CLF can be used to test it directly in the Color Teach program or saved to file for later use either with the OCX or the DLL.
Now to the search algorithm. The SearchOptimum gives you to a given area the best fitting color in a CLF, including the distance to the center of the trained color and a quality. What happens is the following:
From the distances we get the quality in relation to a model. The quality is calculated as follows:
If you do a SearchOptimum, the model with the greatest quality is returned. Note that the quality makes the decision, not the distance. This is because it could be that you have a very loose defined model with a great MaxDistance and a very tight defined model with a very small MaxDistance. It could be that the distance of a SearchColor is closer to the tight defined model but has a higher quality for the loose define model.
If you don't only want the model with the best quality you can do a SearchAll. And you'll get a list with the distances and qualities for all models.
The other option is to calculate the quality not for one search area in an image but for every single pixel. The result is then written to a new image, the destination image. This is done via the filter. A filter also can be generated in the Color Teach program from a given CLF. Note that the filter must be recalculated every time you add or delete an instance or a model or change a parameter.
The filter can be used to classify every pixel in an area. The filter scans through the source area. If one pixel has a color of a model with a quality greater than a defined MinimumQuality then, depending on the filter mode, the pixel is set in the destination image. If the color of the pixel is close to two colors with a quality greater than MinQuality then the higher quality decides.
There are several filter modes which decide how the pixel in the destination image gets set:
| Filtermode | Description |
|---|---|
| Color | The pixel in the destination images is set with the found model (it's center color). |
| B&W | All three planes of the pixel or the one plane of a black & white image in the destination image are set with (R+G+B)/3 of the found color. |
| Transparent | The pixel in the destination image is set with the color of the source image. |
| TransparentInvers | Set all pixels with no »found color« to the color of the source image. |
| Grayscale | Set all pixels in the destination image with the quality multiplied by 255. The result is a 255 gray value image which then can be used for example to find a pattern with Common Vision Blox Minos. |
Some more expressions:
| Classificator | A classificator is created during the learning process. It contains the relevant information on all models. It is used in the search component to »find« the color of a given area. |
| Filter | A filter is created from a classificator. It is used to classify every single pixel (filter) in a given area of an image. |
With the specific teach program relevant user defined colours are trained directly from sample images. The teaching process can take place on-line or off-line with all trained information stored in a colour classifier.
Application
Toolbar
Menus
Create a Color Trainingset Step by Step
| Menu | The menus contain all available functionality. |
| Toolbar | The mostly used functions are also available via the toolbar buttons. The »Grab« button is only available if the selected »Image« is a frame grabber. |
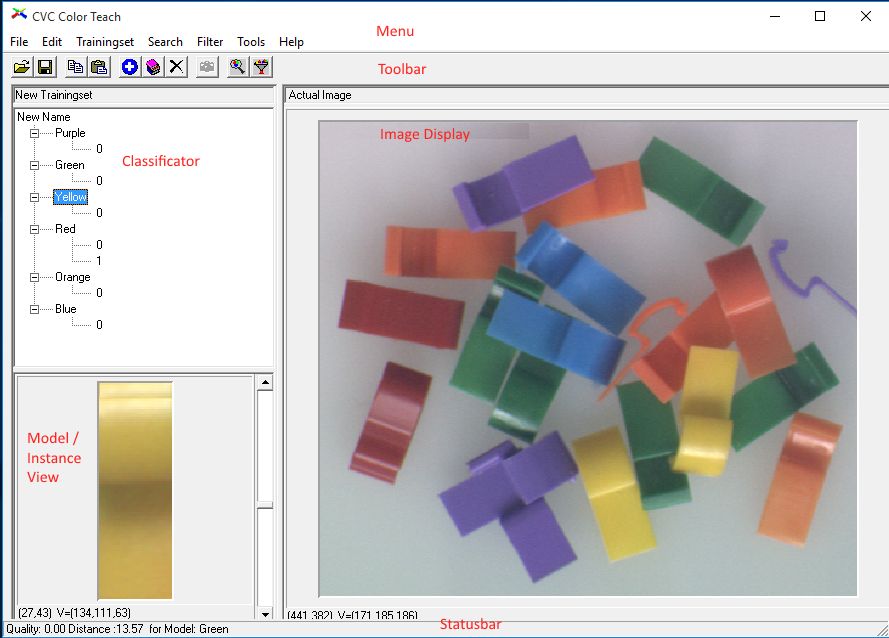
| Classificator | The classificator view shows all models and instances of the actual classificator. |
| Model/Instance View | By clicking on a model or an instance in the classificator view the model/instance view shows the color of the model or the area of an instance. |
| Resize | The Resize bars allow you to enlarge the Common Vision Image display, the classificator view or the Model/Instance view. |
| Statusbar | The statusbar shows the search result. |
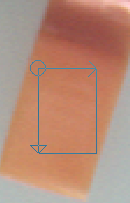
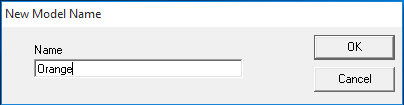
Add Model | Add a new model to the actual classificator. The new model must have at least one instance. If you press that button a dialog will be shown with the actual image. Mark the area with your user defined color and press OK. Color Teach will ask you for the name of the new model. Enter the name an press OK. |
Add Instance | Add a new instance to the selected model in the classificator view. If there is no model selected in the classificator view you can't add a new instance. |
Delete Instance Model | The actual model or instance (selected in the classificator view) will be deleted. |
| Grab | If the »Image« in the ImageDisplay is a frame grabber you can switch the live image on and off. |
Search Color | If you have a classificator with at least one model with at least one instance you can mark an area in the ImageDisplay and search for the best fitting model to that color. |
Filter Image | If you have a classificator with at least one model with at least one instance you can mark an area in the ImageDisplay and filter that area with the actual classificator. |
There are six main menu items which contain all the functionality available in Color Teach.

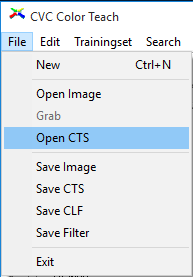
Start with File Menu to open Images and Color Trainings Sets (CTS).
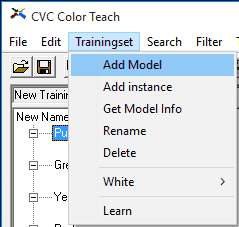
| Add Model | Add a new model to the actual classificator. The new model must have at least one instance. If you press that button a dialog will be shown with the actual image. Mark the area with your user defined color and press OK. Color Teach will ask you for the name of the new model. Enter the name and press OK. |
| Add Instance | Add a new instance to the selected model in the classificator view. If there is no model selected in the classificator view you can't add a new instance. |
| GetModelInfo | Show further information on a model. |
| Rename | Rename the selected classificator or model. |
| Delete | The actual model or instance (selected in the classificator view). |
| Distance | Here you can set MinDistance and MaxDistance manually. |
| White | Define an area in the ImageDisplay which is used as a white reference to work with. |
| Learn | Learn a classificator from actual defined models and instances. This is normally done automatically. The automatic learning can be switched off in the option menu. |
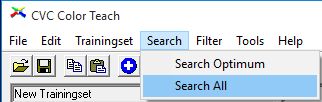
| Search Optimum | Search the best fitting color to the selected area in the Image. The result is shown in the statusbar. |
| Search All | Show Distance and Quality to all trained models of the learned classificator of the selected Area in the ImageDisplay. |

| SetResultColor | SetResultColor will show you a dialog which lets you define a color in combination with a model. This color is set in the resulting image of a filter process if during the filtering of an image this model is found. By default the average color of the model (average of all pixels of all instances) is set to be the output color of the filter process. |
| MinQuality | The minimum quality to find a color in an image during filtering. |
| Mode | There are several filter modes: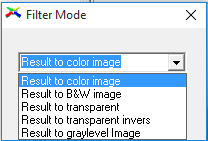 Please refer to »Theory of operation« (Chapter 3) for further information. |
| CalcFilter | Calculate a new filter matrix for the actual classifier with the actual parameters. Anytime a classificator or a parameter of the filter like MinQuality changes the filter matrix must be recalculated. |
| Filter | Filter the selected area in the ImageDisplay. |
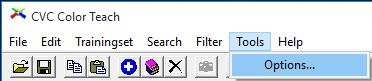
| Options | Shows a dialog with options for the Color Teach. |
The first thing you have to do is start the program Color Teach in %CVB%Applications.
 button in the toolbar.
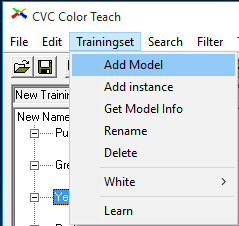
To add an instance to a model first select the model you want to add an instance to in the Color Trainingset-treeview. Now select the menu item Trainingset > Add Instance or right-click the model.

Again a dialog is shown with the loaded Image.
With the just created Color Trainigset you have several options:
→ Save a CTS (Color Trainigset), CLF (Color Classifier) or FLT (Color Filter) file;
→ Test the CTS with a search or a filter.
To do a search, mark an area in the ImageDisplay and hit the search button in the toolbar or select the menu item Search > SearchOptimum. The Quality and Distance of the found model is shown in the status bar and the model will be selected in the Color Trainigset-treeview.

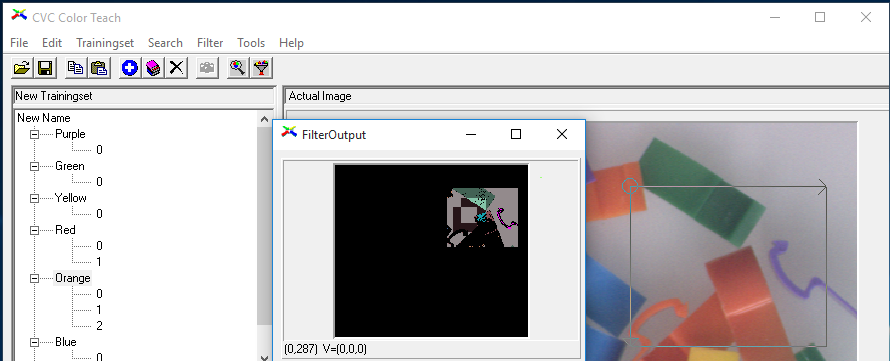
To do a filter operation select the area you want to filter in the ImageDisplay and press the filter button in the toolbar or select Filter > Filter from the menu. A dialog with the result image will be shown.