In a standard scenario we assume that the image data is already available in the host memory.
Nearly each CVB tutorial demonstrates such a program.
The CVB image was created from an image file, a video file or from a CVB Video Interface (VIN) driver.
This can be illustrated by the following scheme:
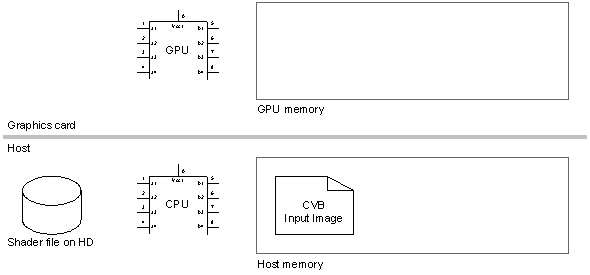
The CVB image exists in the host memory and a HLSL shader file is stored on the hard disk.
The GPU and CPU are available but so far no GPU objects have been created. The system has to be initialized before we can use the GPU.
Initialization
•The first steps are the initialization of the GPU and it all starts with initialization of the library by using the function D3DCreate.
•This function takes a window handle and the size of the image as arguments.
•As a result it returns a CVD3D object which is the root for all other calls to create GPU objects.
Remember to make sure that the lifetime of the window needs to least longer than the lifetime of the object created by D3DCreate.
•Once this object is created we need a texture that is used as an image source for the GPU.
This is done by the function D3DCreateTextureEntrance which takes the CVD3D object, the image’s size and a color format as input arguments and it returns a CVD3DOBJECT as a result.
Ensure that the image size is not greater than the size that was specified in D3DCreate.
Of course you can create smaller images than specified in the call to D3DCreate.
The library currently supports 8 and 16 Bit monochrome images and 24 or 32 Bit color images.
•Additionally we need to create an output image in the GPU memory as well.
This is done with D3DCreateTexture which takes the same parameters as D3DCreateTextureEntrance and which returns a second CVD3DOBJECT as a result.
It is also important to understand that a TextureEntrance can’t be transferred back to the host as well as it can’t be used as a target.
On the other hand a Texture can be used as a TextureEntrance and transferred back to the host but you can’t copy a host image to a Texture.
•The next step is to load and compile the shader program.
This is done by the function D3DCreateShaderFromFile.
The function takes again the CVD3D object as the first parameter, a filename to be loaded and a function name to be used.
Via the fourth argument it’s possible to output compiler error messages in a simple dialog box which can be used during development of the shader program.
The shader version used to compile the shader program is defined in the fifth parameter.
The function returns a CVD3DSHADER object that is used to access and use the shader.
The following schematic illustrates our current setup:
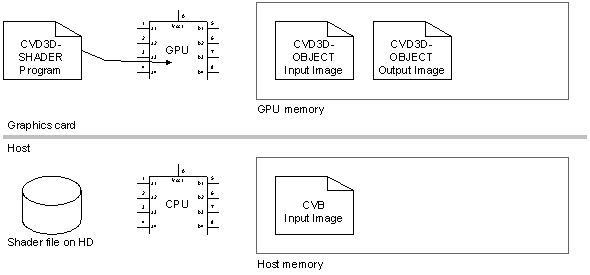
A shader program was loaded and compiled and the input and out images have been allocated in the GPU memory.
What’s missing at this point is the path back to the host.
This is done in two steps.
•First we have to create a so called CVD3DMIRROR object which mirrors the last output image written by the shader program to the host image at any time after D3DUpdate was called with the CVD3DMIRROR object as an argument.
D3DUpdate also synchronizes the execution of the shader program with the host application.
Of course we can create multiple CV3DOBJECT input or output images and the purpose of the CVD3DMIRROR is to transfer a single output image back to the host memory.
•The function to create a mirror is called D3DCreateMirror .
It takes the same parameters as D3DCreateTextureXXX and it returns the CVD3DMIRROR object.
Obviously the mirror needs a counter part in the host memory which is created by D3DCreateImageFromMirror.
This functions takes the mirror as the first argument and a channel (or color plane index) which has to be updated.
Typically you will pass –1 as the argument for the channel which will cause the default image plane according to the color format of the mirror to be updated.
Of course you can update the green channel of a color mirror only be passing a 1 as the channel.
The CVB image returned by the function just points to the mirror object data, it will never copy any data.
The final setup of objects looks like this:

There is one important initialization step left to be done before executing the shader.
A shader might use its own variables which are stored in the GPU registers.
Of course these variables need to be initialized before using the shader.
In case of multiple shader programs in a pipelined scenario these variables need to be initialized before executing an individual shader program, usually within the execution loop.
This step can be compared to the PUSH / POP assembler operations that are involved in any C/C++ code when you call a function.
The question of who is pushing or popping the registers, the caller or the callee, is answered by the calling conventions you might encounter in your compiler.
In case of the GPU the answer is quite simple:
The caller is responsible for the registers and therefore the CVB GPU Processing library takes care about it.
To configure variables in the shader program the function D3DSetFloat takes a CVD3DSHADER, the name of the variable as a string and the new float as parameters to set the variable in the program.
Typically all supplied shaders will use the following variables:
❑ „fImageWidth“, „fImageHeight“ to define the size of the image as a floating point value
❑ „fPixelShiftX“ and "fPixelShiftY“ to define the offset to the center of the pixel. These values are typically defined by (refer the the first shader example):
❑ fPixelShiftX = 1.0f / fImageWidth / 2.0f
❑ fPixelShiftY = 1.0f / fImageHeight / 2.0f
Another function can be used to easily initialize a convolution filter.
D3DConfigureShaderFilter takes again the CVD3DSHADER and the width and height of the image as an argument.
This function will pre-calculate the offset to the pixels within the filter kernel to speed up execution time of convolution filters.
The following part of the source code shows the initialization including error handling in C++:
...
void CMyApp : Init()
{
...
// init variables
m_D3D = NULL;
m_D3DTextureSrc = NULL;
m_D3DTextureDst = NULL;
m_D3DShader = NULL;
m_ImgDst = NULL;
// get image size
DWORD dwWidth = ImageWidth(m_ImgSrc);
DWORD dwHeight = ImageHeight(m_ImgSrc);
// create d3d with the image size we want to use
D3DCreate(this->m_hWnd, dwWidth, dwHeight, m_D3D);
if (!D3DIsD3D(m_D3D))
{
AfxMessageBox("Unable to create Direct3D");
exit(-1);
}
// create a source texture
D3DCreateTextureEntrance(m_D3D, dwWidth, dwHeight, TCF_XRGB, m_D3DTextureSrc);
if (!D3DIsObject(m_D3DTextureSrc))
{
AfxMessageBox("Unable to create src texture 0");
exit(-1);
}
// create a destination texture
D3DCreateTexture(m_D3D, dwWidth, dwHeight, TCF_XRGB, m_D3DTextureDst);
if (!D3DIsObject(m_D3DTextureDst))
{
AfxMessageBox("Unable to create dst texture");
exit(-1);
}
// create a mirror image
D3DCreateMirror(m_D3D, dwWidth, dwHeight, TCF_XRGB, m_D3DMirror);
if (!D3DIsMirror(m_D3DMirror))
{
AfxMessageBox("Unable to create mirror");
exit(-1);
}
// create a cvb image from the mirror in either mono or color format
if (ImageDimension(m_ImgSrc) == 1)
D3DCreateImageFromMirror(m_D3DMirror, 0, m_ImgDst);
else
D3DCreateImageFromMirror(m_D3DMirror, -1, m_ImgDst);
// create the shader
D3DCreateShaderFromFile(m_D3D, S_FILE, S_FUNC, TRUE, TPSV_30, m_D3DShader);
if (!D3DIsShader(m_D3DShader))
{
AfxMessageBox("Unable to create shader");
exit(-1);
}
// set the weighting factor, needs to be done only once but here it is used to make it clear
D3DSetFloat(m_D3DShader, "fSlidingAverage", 0.8f);
// set the image size
D3DSetFloat(m_ D3DShader, "fImageWidth", (float)dwWidth);
D3DSetFloat(m_ D3DShader, "fImageHeight", (float)dwHeight);
// set the pixel shift
D3DSetFloat(m_ D3DShader, "fPixelShiftX", 1.0f / (float)dwWidth / 2.0f);
D3DSetFloat(m_ D3DShader, "fPixelShiftY", 1.0f / (float)dwHeight / 2.0f);// display the result
m_cvDispD3D.SetImage((long)m_ImgDst);
...
}
Execution loop
All objects have been created to use the GPU plus we created the objects to transfer the image data back to the host.
Once we reached this point, the loop to process the image data is quite simple.
•We need to copy the source image from the host to the GPU memory.
This can be done by the D3DWriteImageToObject function.
The function takes the host image as the first parameter followed by the source plane to be used.
Again you will typically use –1 to specify the default plane based on the number of planes of the source image.
The next two parameters specify the D3DOBJECT and its plane index to write the data to.
Again –1 defines the default plane according to the color format of the D3DOBJECT.
•Invoke the shader function which writes the rendered input image to the output image in the GPU memory.
The shader can be rendered by calling D3DRender.
The function takes the input CVD3DOBJECT and the output CVD3DOBJECT as well as the CVD3DSHADER as parameters.
Note that this function is executed asynchronously, it will return before the GPU finished the operation.
If you pass NULL as the CVD3DSHADER object it will simply copy the data from source to destination.
•Update the mirror with the last rendered image to transfer it back to the host memory.
The last step in the execution loop is to update the CVD3DMIRROR object by using D3DUpdate on the CVD3DMIRROR object.
This function will now wait for the GPU to finish and then it will transfer the image data back to the host.
This loop has to be executed with every image that has been acquired by the system.
The output of the GPU can finally be accessed as a standard CVB image using the image attached to the mirror.
The best position for the execution loop is the ImageSnapped event of the Image Control which will be invoked for every image acquired by the VIN driver.
This is the source code:
void CMyApp : ImageSnapedCvimagectrl1()
{
// copy image to src texture
D3DWriteImageToObject(m_ImgSrc, -1, m_D3DTextureSrc, -1);
// ...and render it to the dst texture
D3DRender(m_D3DTextureSrc, m_ D3DTextureDst, m_ D3DShader);
// update image data
D3DUpdate(m_D3DMirror);
// refresh the display
m_cvDispD3D.Refresh();
}
Overall there are only 10 functions involved in using the processing power of the GPU in a CVB environment.
Here is an updated version of the schematics to show the functions being used during initialization and execution:
