How to rotate the image from the camera
Converting images from Color cameras with bayer sensors
Color Formats and Pixeldepth
By default, CVB automatically detects the correct preprocessing for the pixel format / color format the camera delivers
(default parameter Auto Detect at Device Options > CVB Color Format menu or direct in the GenICam.ini-file).
For example if the camera delivers 8 Bit Bayer data, CVB converts the image to a RGB 24 image using an 2x2 RGB conversion.
If a 8 Bit Mono image is detected, the raw 8 Bit image is used.
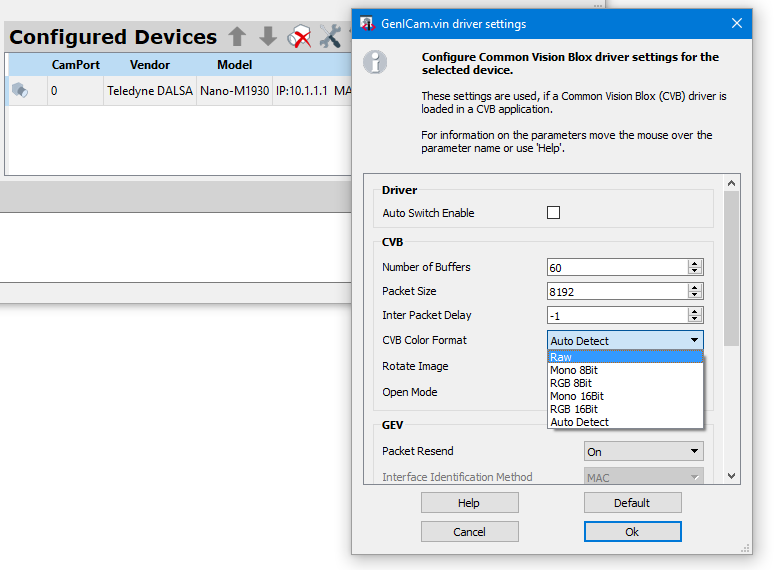
Another example would be for a camera delivering 10 Bit monochrome data which needs to be scaled down to 8 Bit monochrome data.
In this case you could set the Pixel Format in the driver to 8 Bit monochrome (also with Device Options > CVB Color Format menu or direct in the GenICam.ini-file).
Supported source color formats:
•Mono 8Bit
•Mono 10Bit
•Mono 12Bit
•Mono 16Bit
•Bayer 8Bit
•Bayer 10Bit
•Mono 10Bit Packed (GigE only)
•Mono 12Bit Packed (GigE only)
•All Formats as Raw
When the Pixel Format is set to Raw in the driver, all source formats are supported. In this case the image is not converted after acquisition.
Supported conversions:
All Color formats can be converted to RGB 24.
All Mono formats can be converted to Mono 8.
For hints dealing with high bit images ( > 8 Bit) in CVB please refer to the Common Vision Blox Manual.
Changing the image resolution
If you change a setting in the camera which changes the resolution or pixel size of the image, you need to update the image object by using the IImageRect Interface.
Refer this section for more information.
How to rotate the image from the camera
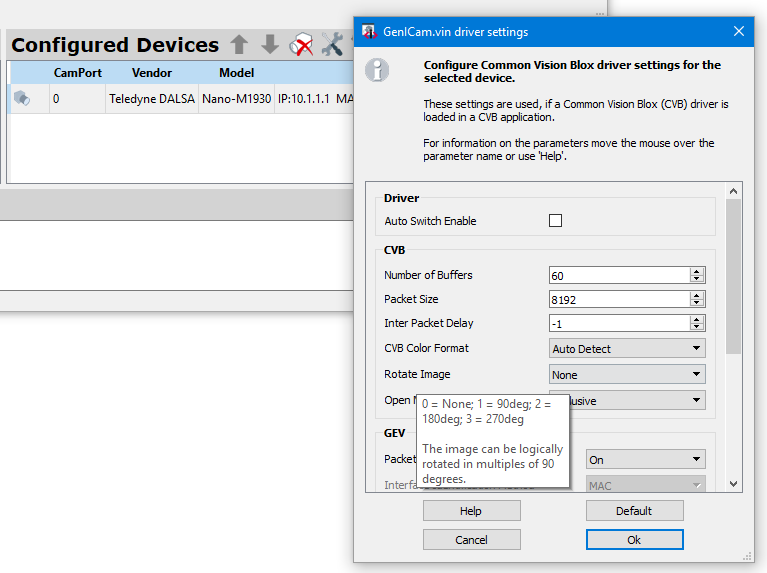
For most of the supported image acquisition devices (cameras or frame grabbers) it is possible to rotate the image fast via an entry in Device Options -> Rotate Image.
Supported values are :
0: Rotate 0 degrees
1: Rotate 90 degrees
2: Rotate 180 degrees
3: Rotate 270 degrees
CVB also offers general functions for rotating images (e.g. RotateImage, CreateMatrixTransformedImage, CreateMatrixTransformedImageEx).
Those functions take some time to perform.
Converting images from Color cameras with Bayer sensors
Debayering (conversion into RGB images) can be done with different methods, depending on the camera model and the drivers in use.
It is not recommended to convert frames to RGB in cameras before transmission if the frame rate is extremely high.
This is because raw Bayer requires only 8/10 Bit versus the 24 Bit necessary for RGB.
•Debayering by the CVB GenICam driver:
By default the GenICam VIN converts raw Bayer coded images into 8 Bit RGB images. This is done via a basic 2x2 decoding in order to get the maximum performance.
In this mode the raw Bayer image from camera is not seen by the application. The CVB image seen by the application is a RGB image.
This behavior can be changed by selecting a different PixelFormat (which by default is set to Auto) in the the GenICam Browser/CVB ManagementConsole Device Options -> CVB Color Format (refer above).
There the user is free to select a “Raw” output in order get the raw Bayer image. In this case no conversion is applied and the original image from the camera is passed to the application.
•Debayering via Software:
If other options are not available or desired, the Debayering operation can also be performed in software after image transmission.
This generally allows the greatest degree of flexibility and thus yields the best quality results (e.g. 3x3 debayering).
The high performance CVB BayerToRGB tool has been developed to allow easy integration of this task.
•Debayering in the camera:
Certain camera models, like the Dalsa Genie series, are capable of doing the Debayering and white balancing within the camera, i.e. on-chip.
The images are then transferred as RGB. It is of course still possible to transfer raw Bayer format.
In the Property Grid it is possible to see the actual settings of white balancing and in which format the image is transferred.
Settings and output image for a RGB image:
Please select the desired Pixel Format via the Property Grid - or your own CVB Application and save the format you choosed via the parameter set User Sets.
|
User Set Selector |
User Set1 |
|
User Set Default Selector |
User Set1 ( default configuration ) |
|
User Set Save |
Execute Button |
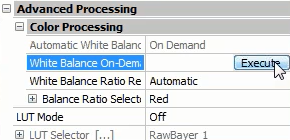
White Balance
Some cameras do not support white balance, other cameras can only use white balance with RGB output with a reduced frame rate.
For such cases it is necessary to transfer the Bayer image and execute white balance in extra software programs.
CVB provides the white balance functionality in the library with the Image Manager functions CalculateWhiteBalance and ApplyWhiteBalance.
To test these functions the Common Vision Blox Viewer can be used:
•Open the Common Vision Blox Viewer, load the GenICam Driver and select the context menu "Extras -> White Balance"
•Click on "Set" to adjust the White Balance. Afterwards you can show the results by checking the "Apply" caption.
•If the determined scale factors for the different colors should be shown or changed, use the "Edit Scale Factors" caption.

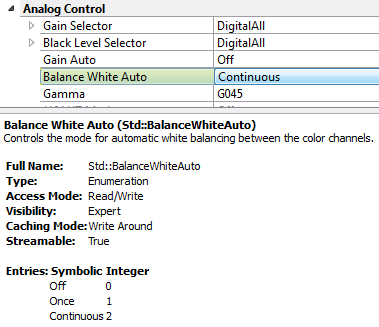
For cameras supporting white balance based on GenICam BalanceWhiteAuto parameter there are settings via the NodeMap available, such as :
|
|